A cardinal mark is placed in one quadrant of a danger and named for the compass direction in which navigable water lies: you pass a north cardinal to its north, a south cardinal to its south. That single sentence is the whole system. Every visual feature is a way of telling you which of the four it is, and the features are consistent with each other, which is what makes them learnable. Cardinal marks are identical in IALA Region A and Region B.
Start with the cones
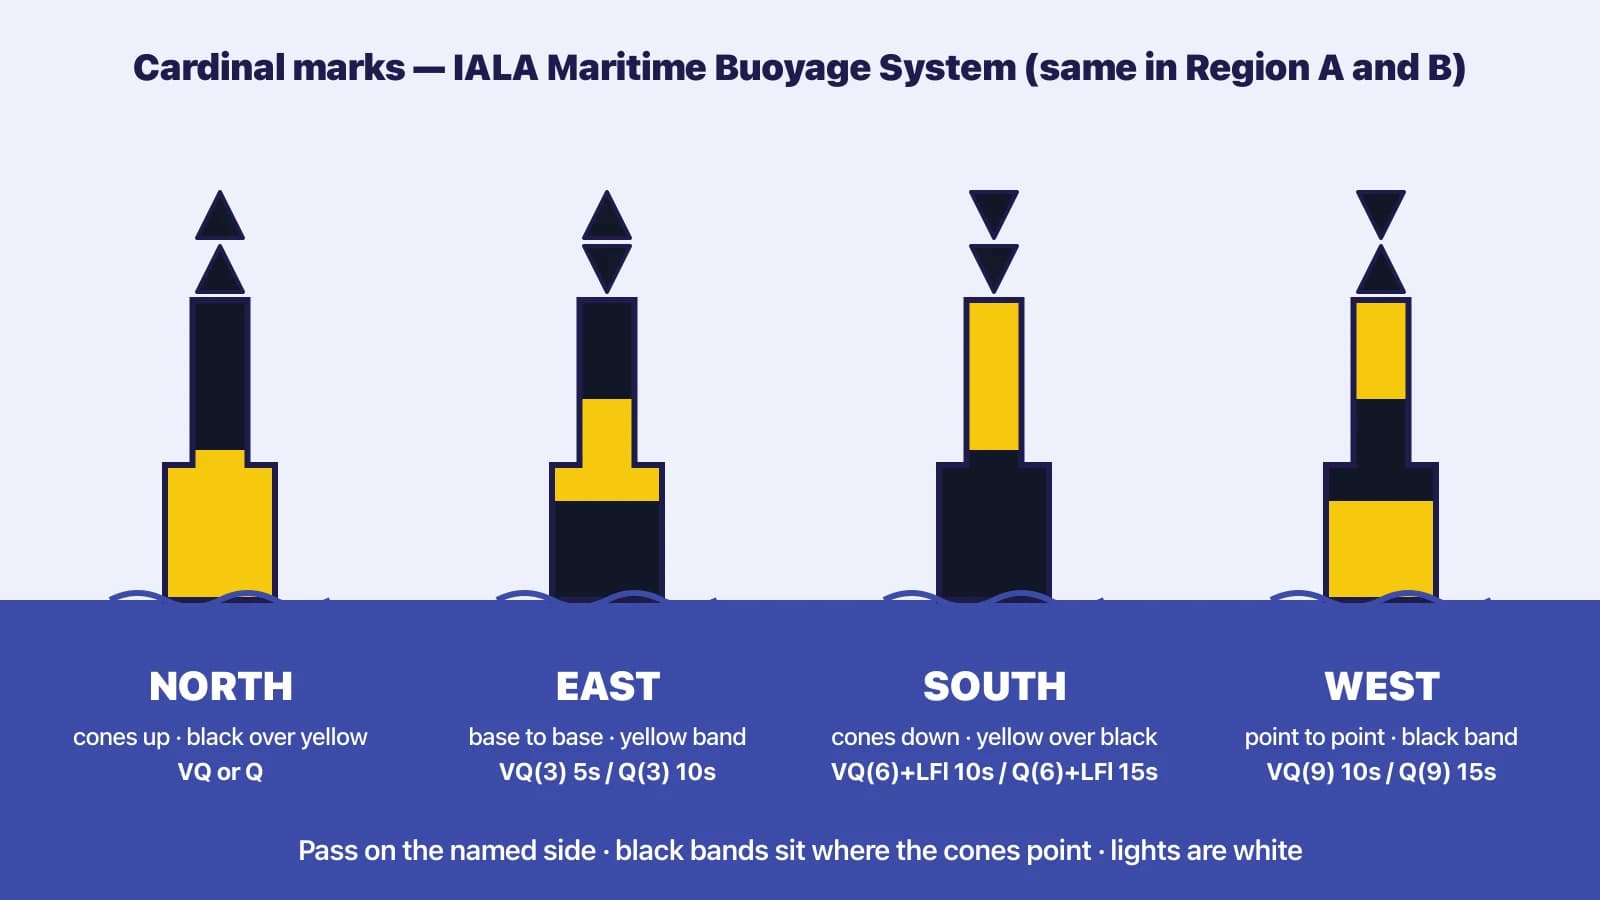
Each cardinal mark carries two black cones, one above the other. The cones are the primary identifier and the part to learn first:
- North: both cones point up. Up is north on the chart.
- South: both cones point down.
- East: cones base to base, making an egg shape — “E for egg”.
- West: cones point to point, making a wineglass — “W for wineglass”.
The colours follow the cones
Cardinal marks are painted in yellow and black horizontal bands. Rather than memorising the band order, notice that black is always where the cones point:
- North: cones point up, so black is on top, yellow below.
- South: cones point down, so black is at the bottom, yellow above.
- East: cones point up and down, away from each other, so black is at the top and bottom with a single broad yellow band in the middle.
- West: cones point to the middle, so black is in the middle with yellow above and below.
Four cardinal marks with their topmarks, colour bands and light rhythms labelled.
The lights follow a clock face
All cardinal marks show white lights, either quick flashing (Q, 50 or 60 flashes a minute) or very quick flashing (VQ, 100 or 120 a minute). Picture a clock face with north at 12:
| Mark | Clock position | Rhythm |
|---|---|---|
| North | 12 | Continuous: VQ or Q |
| East | 3 | Three flashes: VQ(3) every 5 s or Q(3) every 10 s |
| South | 6 | Six flashes then one long flash: VQ(6)+LFl every 10 s or Q(6)+LFl every 15 s |
| West | 9 | Nine flashes: VQ(9) every 10 s or Q(9) every 15 s |
The long flash — at least two seconds — on the south cardinal exists, in IALA's words, so that three or nine flashes cannot be mistaken for six. If you see a group of flashes followed by a distinctly longer one, it is south, whatever you counted.
Using them in practice
Plan view of a danger with four cardinal marks around it and arrows showing safe water on the named side of each.
When a cardinal comes into view, identify it, then look at the chart to see what it is guarding. A cardinal mark tells you which side is safe; it does not tell you how far the danger extends, and shoals and wrecks often reach a long way from the buoy on the other sides. “Pass to the north” does not mean “shave it” — it means the navigable water is that way, so give the mark the clearance the chart suggests. Where a danger is marked by several cardinals, they combine: passing north of the north cardinal and east of the east cardinal keeps you clear of the whole feature.
Try it: where is the safe water?
Interactive quiz: a cardinal mark is shown and you choose which side the safe water lies; the answer explains the cones, bands and light rhythm.
Check yourselfAt night you see a white light flashing in groups of nine, every fifteen seconds. Which mark is it, what does its topmark look like, and which side do you pass?Show answer
Q(9) 15s is a west cardinal — 9 o'clock on the clock face. Its cones point to point (the wineglass), and by day it is yellow with a single broad black band in the middle, where the cones point. Pass to the west of it: navigable water lies west of the mark, the danger to its east.
Key takeaways
- A cardinal mark is named for the side on which navigable water lies. Pass on that side.
- Two black cones: up = north, down = south, base to base = east, point to point = west.
- Black bands are where the cones point.
- White lights only: continuous for north; 3, 6 + long, and 9 flashes for east, south and west, in Q or VQ.
- The mark shows the safe side, not the extent of the danger — read the chart for that.