The IALA Maritime Buoyage System is what makes a chart readable in another country: the same shapes, colours and light rhythms mean the same things almost everywhere. The one historical compromise is that the world is split into two regions with opposite lateral colours. If you learned to sail in the UK and then charter in the Caribbean, this is the single most important thing to re-check before you enter a harbour.
Where each region applies
| Region | Where | Entering in the conventional direction of buoyage, keep… |
|---|---|---|
| A | Europe, Africa, Australia, New Zealand, the Gulf and some Asian countries | Red (port-hand) marks to port, green (starboard-hand) marks to starboard |
| B | North, Central and South America, Japan, Republic of Korea, Philippines | Red (starboard-hand) marks to starboard, green (port-hand) marks to port |
What “direction of buoyage” actually means
Port-hand and starboard-hand only make sense relative to a direction of travel, so IALA defines a conventional direction of buoyage, which must be shown on the chart. It is either the general direction a mariner takes when approaching a harbour, river, estuary or other waterway from seaward, or a direction fixed by the national authority — which, in principle, follows a clockwise direction around land masses. The “returning from sea” idea is therefore only half the definition. Along an open coast, the direction is a conventional one that you must read from the chart's buoyage arrow, and it can mean the same buoy is a port-hand mark heading one way along the coast and a starboard-hand mark heading back.
Around the British Isles, for example, the general direction runs north along the west coast and through the Irish Sea, east through the English Channel and north through the North Sea. Other countries define their own. The rule is simple: find the arrow on the chart, then apply the colours.
Lateral marks — the ones that differ
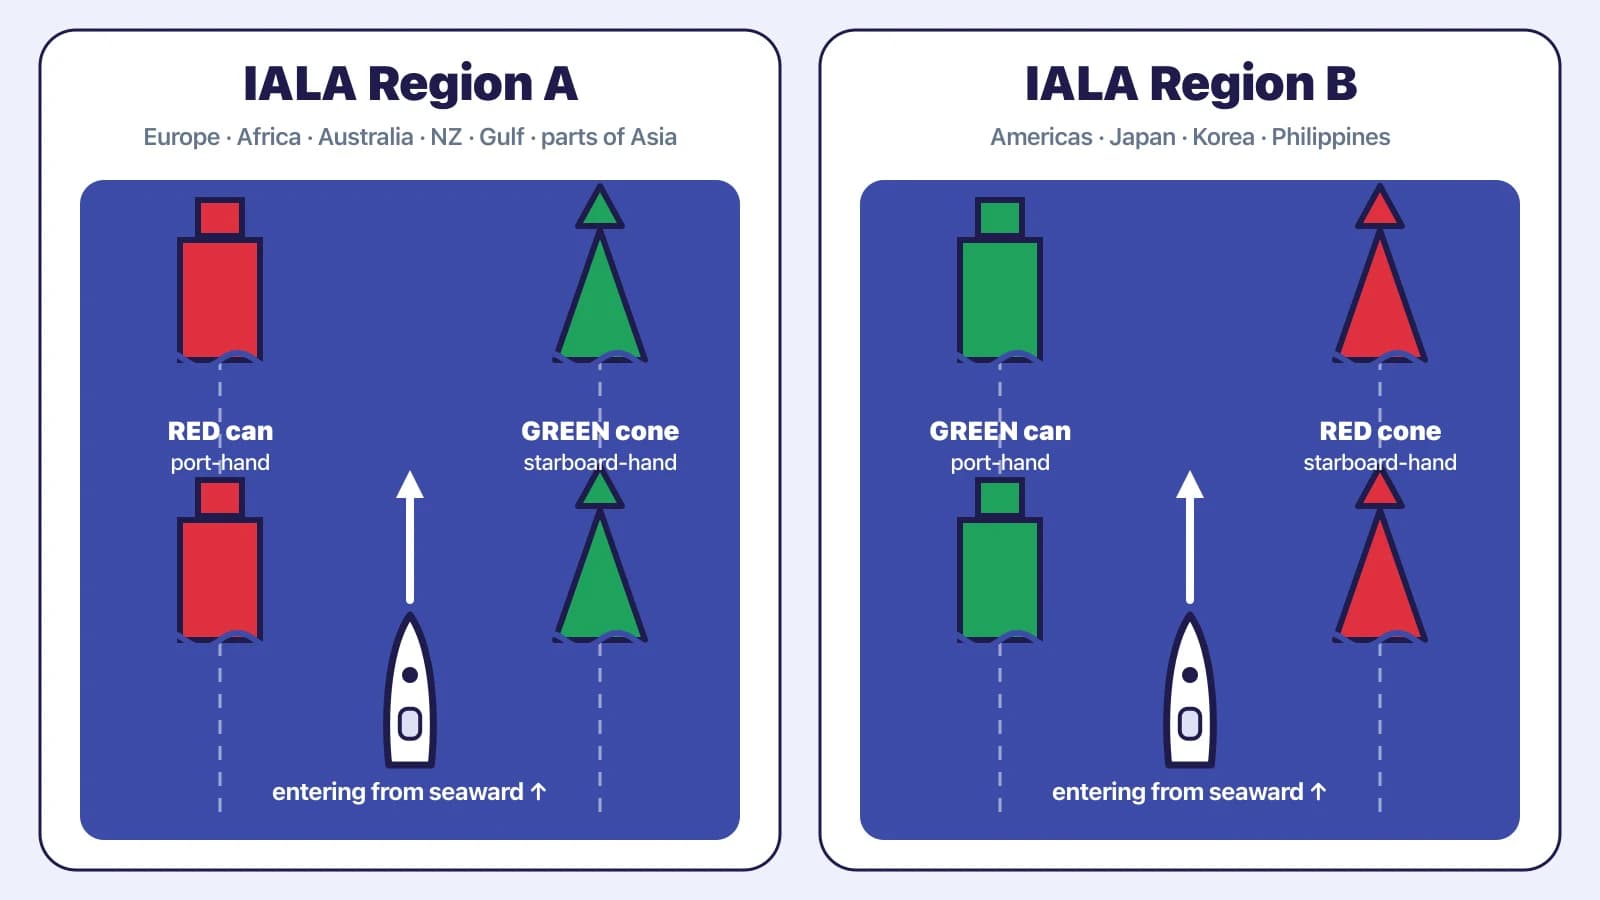
Lateral marks show the sides of a channel. The shape is the clue that survives fading paint: cylindrical (can) buoys and can topmarks are port-hand marks; conical buoys and cone-point-up topmarks are starboard-hand marks. That shape rule holds in both regions — only the colour swaps. Pillar and spar buoys, which have no distinctive shape, carry the appropriate topmark instead.
Two harbour approaches side by side showing red cans to port and green cones to starboard in Region A, and green cans to port and red cones to starboard in Region B.
| Mark | Shape / topmark | Region A | Region B | Light |
|---|---|---|---|---|
| Port-hand | Can / single can topmark | Red | Green | Same colour as the mark; any rhythm other than composite group flashing (2+1) |
| Starboard-hand | Cone / single cone, point up | Green | Red | Same colour as the mark; any rhythm other than (2+1) |
| Preferred channel to starboard | Can / can topmark | Red with one broad green band | Green with one broad red band | Colour of the main (top) band, composite group flashing (2+1) |
| Preferred channel to port | Cone / cone topmark | Green with one broad red band | Red with one broad green band | Colour of the main (top) band, composite group flashing (2+1) |
Four preferred-channel marks, two for each region, showing top-band colour, band, shape and light.
Region B sailors say “red right returning”. Region A sailors have the less catchy “is there any red port left?” — red, port (the drink), left. Both describe the same idea from opposite sides.
Numbers on buoys
Numbering is not what distinguishes the regions. IALA says that if lateral marks are numbered or lettered, the numbering follows the conventional direction of buoyage, and recommends (“should”) even numbers on red marks and odd numbers on green — but whether marks are numbered at all is a national decision. In U.S. waters the practice is mandatory and consistent: red marks carry even numbers, green marks odd, increasing from seaward. Elsewhere you may find marks numbered, lettered or neither, so treat numbers as a way of matching a buoy to the chart rather than as a rule about which side it is on.
Try it: same harbour, other region
Interactive: a toggle switches one harbour approach between IALA Region A and Region B, swapping lateral mark colours while shapes stay fixed.
Cardinal marks — the same everywhere
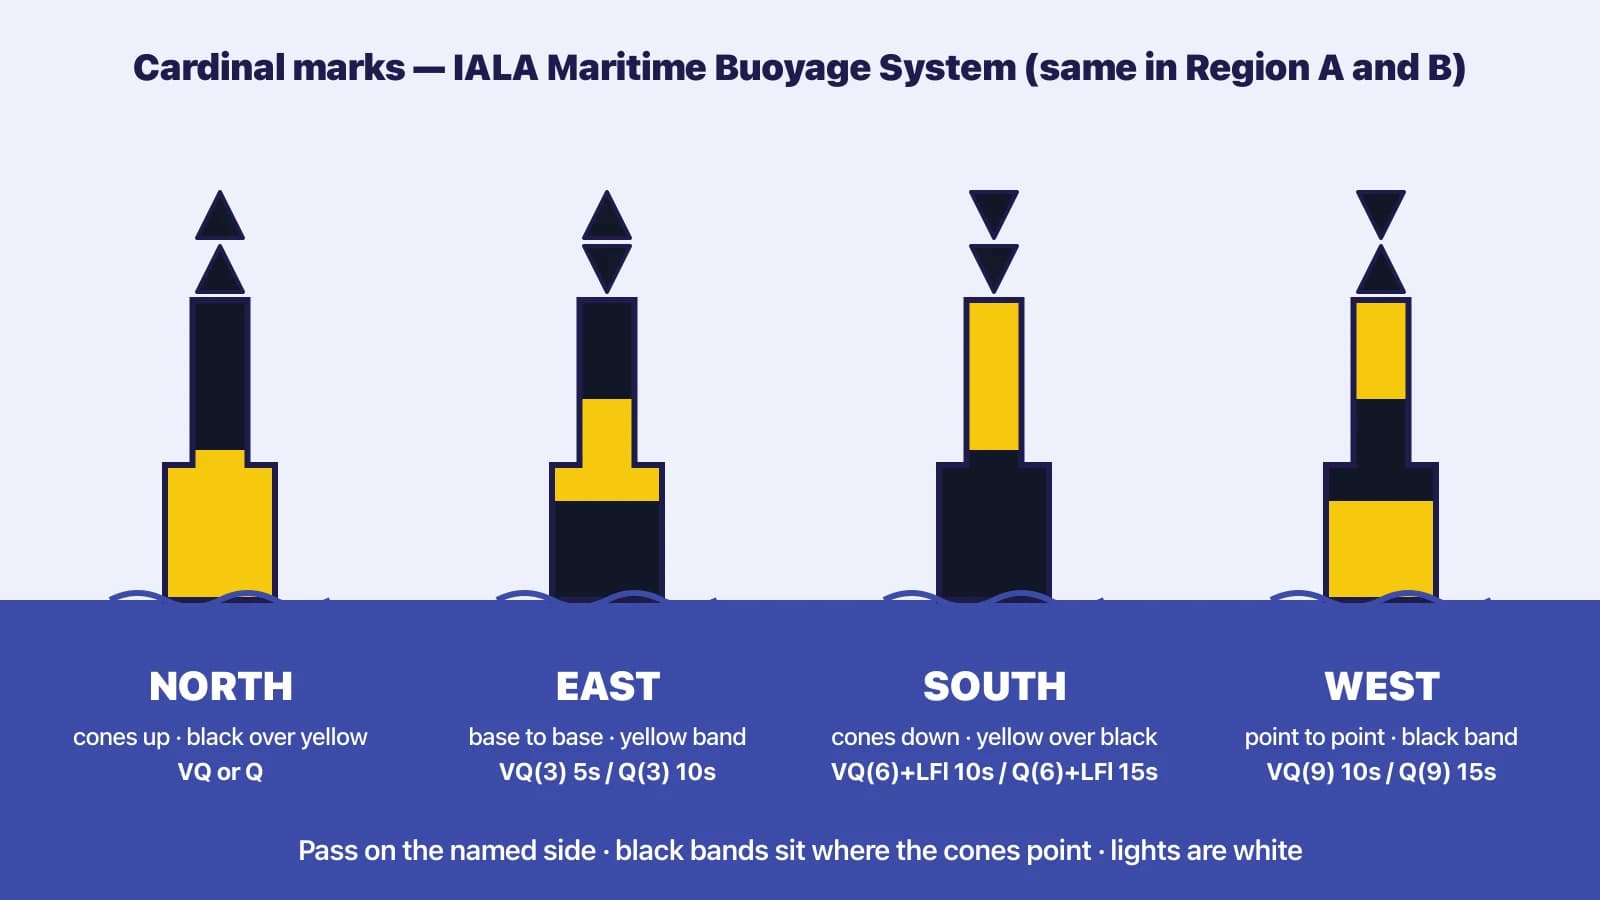
Cardinal marks tell you where navigable water lies relative to a danger, named for the compass quadrant: pass north of a north cardinal, east of an east cardinal, and so on. They are black and yellow pillars or spars with two black cone topmarks; the cones tell you the quadrant even when you cannot make out the bands. The full memory system is in our separate guide on cardinal marks; the essentials are:
- North: cones both pointing up; black above yellow; continuous quick or very quick white flashing.
- East: cones base to base; black with a single broad yellow band; three flashes — VQ(3) every 5 s or Q(3) every 10 s.
- South: cones both pointing down; yellow above black; six flashes then a long flash — VQ(6)+LFl every 10 s or Q(6)+LFl every 15 s.
- West: cones point to point; yellow with a single broad black band; nine flashes — VQ(9) every 10 s or Q(9) every 15 s.
One regional note: cardinal marks are rarely used in U.S. waters, and the USCG's boater guidance on the U.S. Aids to Navigation System does not feature them; junctions and dangers there are normally marked laterally. Do not expect to see many.
Isolated danger, safe water, special and emergency wreck marks
Isolated danger, safe water, special and emergency wreck marks with their colours, topmarks and lights.
- Isolated danger mark: black with one or more broad red horizontal bands, two black spheres on top, placed on or near a danger with navigable water all round. Light: white, group flashing (2).
- Safe water mark: red and white vertical stripes, a single red sphere topmark, spherical or a pillar/spar with the spherical topmark. Marks mid-channel, a fairway or a landfall. Light: white — isophase, occulting, one long flash every 10 s, or Morse “A”.
- Special mark: yellow, with a single yellow X topmark, marking something that is not primarily navigational — spoil grounds, cables, racing marks, recreation zones. Light: yellow, with a rhythm not used by the white lights of cardinal, isolated danger or safe water marks.
- Emergency wreck-marking buoy: blue and yellow vertical stripes (four to eight of them), a yellow upright cross topmark, and an alternating blue and yellow light, one second each. Placed over a new danger until it is charted and permanently marked.
Reading buoyage at night
The colour of a light is the first filter: red and green are lateral marks; white is cardinal, isolated danger or safe water; yellow is a special mark; alternating blue and yellow is a new wreck. The rhythm does the rest. Continuous quick flashing white is a north cardinal; count the groups for east, south and west; two white flashes is isolated danger; a slow, even white rhythm or Morse A is safe water; composite (2+1) in red or green is a preferred-channel mark. Always confirm the characteristic against the chart or almanac rather than trusting the colour of a distant light, which is hard to judge.
Local systems to know about in U.S. waters
Two U.S. variations catch people out. On the Western Rivers (the Mississippi above Baton Rouge and its tributaries, among others) buoys are not numbered, mile markers replace numbers on beacons, isolated danger and safe water marks are not used, and lights on lateral aids may be white. On the Intracoastal Waterway, which shares aids with cross-running channels, the ICW is identified by yellow symbols: keep yellow triangles to starboard and yellow squares to port when following the ICW from New Jersey towards Texas, regardless of the colour of the aid they are painted on.
Check yourselfEntering a Region A harbour, you see ahead a green conical buoy with a broad red band, flashing green (2+1). Which side do you leave it on to stay in the main channel?Show answer
Treat it as a green starboard-hand mark and leave it on your starboard side. It is the Region A “preferred channel to port” mark: by keeping it to starboard you take the channel that lies to port of the mark, which is the preferred one. The red band tells you a secondary channel branches off on the other side, and the (2+1) rhythm in the main colour confirms it is a preferred-channel mark rather than a plain lateral.
Key takeaways
- Region A: red to port, green to starboard when following the direction of buoyage. Region B: the reverse. Shapes and topmarks (can = port, cone = starboard) are the same in both.
- The direction of buoyage is shown on the chart; “from seaward” is only one of its two definitions, and along a coast it is a convention, in principle clockwise around land.
- Preferred-channel marks are lateral marks of their top-band colour with a band of the other colour and a (2+1) light.
- Numbering is national practice (mandatory and even-on-red in the U.S.), not a Region A/B rule.
- Cardinal, isolated danger, safe water, special and emergency wreck marks are identical in both regions.